If you are confused about how to take a screenshot or hearing for the first time that capturing the work you are doing of your MacBook is possible, then you should go through this article which will help you a lot. Taking a screenshot on Mac is very easy, and you will master it in no time. Check simple steps on How to Take a Screenshot on a Mac below.
Capturing The Full Screen:
If you are still using the older versions of macOS, then you can use the old keyboard shortcut of Shift-Command-3 to get the whole screen on the screenshot. You will see that the image has been saved on your desktop. If you have switched to the latest macOS Mojave then things have changed quite a bit, and the process has become more comfortable.
You have to select Shift-Command-5 then to take all kinds of a screenshot, and you may also take a screen recording from the same. Press Shift-Command-5 on your keyboard and then you will see an on-screen capture control panel. Select the option that will capture a screenshot of your entire screen.
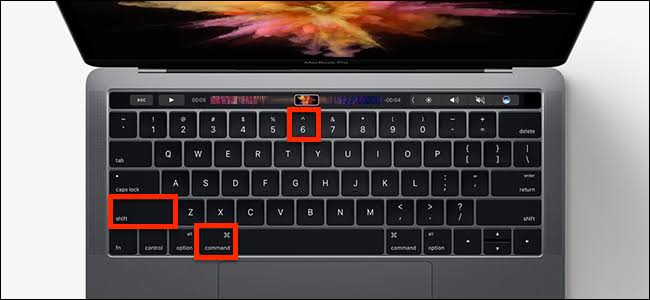
The cursor, then, will take the form of a camera icon. You can click anywhere on the screen to make a ‘shot.’ You may also click the ‘Capture’ option on the panel to take a screenshot of the entire screen. You see that a thumbnail of the screen will appear momentarily on the corner of the screen and the image will be saved on the desktop as it did for the previous versions.
Capturing A Window:
To capture a selected portion of a screen, you must press Shift-Command-4 if you are using the older versions of macOS. Press shift-Command-4 then the spacebar. The pointer will change into a camera icon. You must then select a window to take a picture of that window. If you want to omit the window’s shadow from the picture, you would have to press and hold the option (⌥) while you click to capture the image.
You will find the image saved on your desktop. If you have upgraded your macOS to the new macOS Mojave, then you would have to press Shift-Command-5, and you will find an on-screen capture control option on your screen. You must then select the capture selected window option from the on-screen capture control option. Click and drag on the portion of the screen you want to save as an image.
Click the capture option from the on-screen capture control. You will find that the image will be saved on your desktop. For a brief moment, you will see that the thumbnail of the selected portion of the image will appear on the corner of the screen. You can click the thumbnail to edit the screenshot or you will find a number of different options that you can choose to edit the screenshot.
Capturing A Selected Portion On The Screen:
The process is very similar to the above option. If you are using the latest Mac OS Mojave then select the Shift-Command-5 option and you will find the on-screen capture controls on your desktop, you must choose the Capture Selected Portion option from the on-screen capture controls. Click and drag on the area from the screen that you want to save as an image to select it, you must drag from within the section if you’re going to move the whole part.
Find the capture option on the on-screen capture controls. Click the capture option to save the image on your desktop. As usual, a thumbnail will appear on the corner of your screen. You can edit the screenshot by clicking on the thumbnail. If you are still stuck on the older version of Mac OS then you must type shift-Command-4 on your keyboard, you must then use your cursor to click and drag on the area that you want to capture. To select the whole area, click and drag the space bar the whole time to do the process. After selection, you just need to release the button of the mouse on the trackpad to get the image saved on your desktop.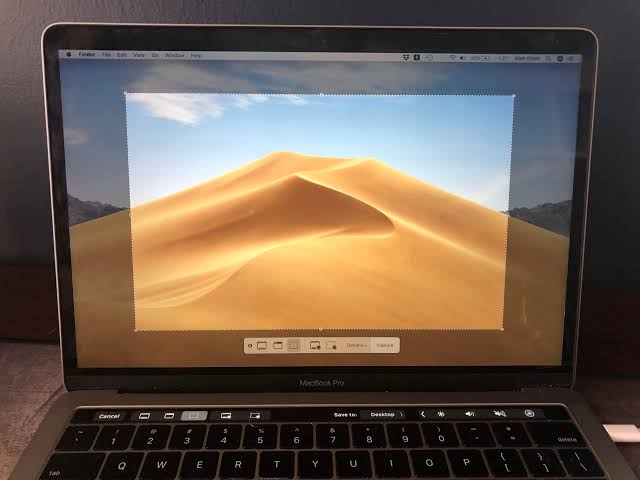
Capturing A Menu
To capture the menu in the latest Mac OS Mojave version, you can take the help of the above three options. Just click on the menu to show its contents. You can then capture the entire screen or the window because the menu will be heated like a window, you may also select a portion of the screen to get the image of the menu saved on your desktop. In all versions of Mac OS, you may choose to use the option of typing shift-Command-4 on your keyboard and selecting the portion that you want to screenshot that is the menu in this case. Just follow the steps mentioned above that is used to capture a part of the screen, and you will find the image of the menu saved on your desktop.
Read More – Learn How to Track the Speed Post by SMS
The Process Of Markup, Shares, And Saves:
This will especially help students who take down notes on the laptops and also show people who are working in the office take notes which may be saved as PDF files or images on their MacBook. You will find the markup option when you are using quick action or a quick look on Mac. There will be a number of options that will be available to you use it on your file. Those options will depend upon the type of data you have opened. Some of the common choices are sketched, draw, highlight a portion of the document, or even sign.
Also, Check – Score Hero Mod Apk Download Guide.
You can share the images, from the share option via your mail or cloud; there will be a lot of other options as well depending upon the file. You may save the data on your desktop or iCloud depending upon your storage.
Changing The Settings
You can change your settings and customize your MacBook, anyway, you want. With the latest updates, new options are emerging. Explore your device to understand all the new possibilities.
Conclusion
It is straightforward to take a screenshot on your Mac device. Just follow the steps carefully, and you will be able to do it like a pro in no time.
Leave a Reply